Wednesday, May 26, 2010

Daring Baker's Croquembouche


This month’s Daring Baker’s challenge was hosted by Little Miss Cupcake, and the challenge was to make a Croquembouche, or Piece Montee, which is basically lots of cream puffs all piled up into total amazingness.

For the challenge, we had to make the pastry cream, pate a choux, and use a glaze to mount the puffs into a structure. I chose to make classic Vanilla Bean pastry cream, and mounted the puffs freestanding with melted chocolate.

I made the pastry cream a day ahead and let it set in the refrigerator overnight.

The pate a choux is made by first boiling water, butter, salt and sugar together. Then you dump in flour and stir really hard. What I found difficult was adding the eggs. The recipe called for 4 eggs, adding one at a time. It was a hassle to incorporate the egg easily, taking some extra time. When I made gougeres, I added the egg in the food processor, and I think that would have been a better method.

Once the puffs were baked and out of the oven, I let them cool completely. When I was ready to fill the puffs, I fitted a pastry bag with a small sharp tip and filled with pastry cream. With the sharp tip, I puncture the bottom with the tip, and fill with pastry cream. Once I started to fill the puffs, I got a good feeling for what was overfull and what was just right.

After the puffs were filled and ready to be assembled into the little tower, I melted 8 oz of chocolate, to be used as the glue for my tower.

Dipping the filled puffs in the melted chocolate, I started placing the puffs very carefully onto a small plate. A couple times I had to chill the croquembouche in the fridge to make sure it was firm and wouldn’t turn into a catastrophe on me.

Once the piece was put together, I drizzled more chocolate on, and called it a masterpiece!

Tuesday, May 25, 2010

Vegetable Minestrone Soup


Soup is a favorite staple around our house, and this soup is essential. It’s easy to add different seasonal ingredients to the soup, each time tasting different and wonderful.

With the vegetables, we add whatever is around, being fond on onion, garlic, and tomato. The original recipe calls for zucchini, but I am not a huge fan of it in soup, so we just adjust other amounts accordingly. If leaks are out of season and too expensive, we also adjust other quantities of veggies. It’s just a launching board!

We have also experimented with the type of pasta/grain added to the soup. We have added small mini-sized pasta, medium-sized pasta, rice, tortellini, ravioli, and this last time we added orzo, which was fantastic.

The cheese rind is necessary, adding an amazing flavor to the broth. Cheese rinds can be find at your local gourmet cheese counter. I have seen bags of cheese rinds packaged together for sale specifically for soups, but I have also asked the workers at the cheese counter if they have any. They are often left over. Or use the soup as an excuse to buy some nice cheese to use for the rind!

If you have a specific choice of been to add, feel free! We like cannellini beans, garbanzo, any type of white bean works well.

Vegetable Minestrone Soup, adapted from Cook’s Illustrated

2 Leeks, sliced, white and light green parts only

10 baby cut carrots, chopped (any type of carrot will work, we always have baby carrots on hand)

2 medium onions, chopped

4 ribs celery, chopped

1 medium russet potato, peeled and cubed

3-4 cups spinach, cut into strips ( I trim the stems off as well)

1 Tbsp chopped garlic

8 cups water

2 14 oz cans diced tomatoes, drained of liquids

Cheese rind, any type of hard cheese, can be found at gourmet cheese counter, ask

1/4 cup pesto (I have found this optional)

1 cup Orzo, uncooked

1 can garbanzo beans, drained and rinsed

salt and pepper, to taste

  1. In a cast iron soup pot, add all chopped vegetables, tomatoes, garlic, cheese rind, and water and bring to a boil. Once brought to a boil, turn heat to medium low and let simmer for about an hour, stirring occasionally.
  2. Add Orzo, or preferred pasta, and cook an additional 10 minutes, or until grain/pasta is at the desired tenderness.
  3. Add garbanzo beans and cook until beans are warm, about 5 minutes.
  4. Mix in pesto, if using, and add salt and pepper to taste.

Monday, May 17, 2010

Amazing Gougeres


Back at Easter (yes, I know that was a while ago), some friends invited us over for a big Easter dinner. Hubby and I were bringing a bunch of stuff,but I wanted to make something out of the ordinary to bring. Since Hubby looooves cheese, Gougeres would be perfect!

I had never made pate a choux before, but David Lebovitz’s recipe made it perfectly easy, and you only need a small handful of ingredients, like the following.

See, you boil some butter and water, with a pinch of salt and cayenne pepper. While your water is starting to boil, you shred some cheese, anything semi-hard, I used gruyere.

Then you take it off the heat, throw in some flour and mix it around.

Then, in your awesomely handy food processor, dump the clump of dough, plus most of the cheese and some fresh herbs, and mix in the food processor until all nice and mixed.

Scrape the sticky mixture of dough into a piping bag, fitted with a large tip. I use a standard coupler tip, since it is the right size, and just as easy as a tip. If you don’t have a piping bag, people say you can snip the tip of a freezer bag and use that, but I haven’t tried it that way. If you have to use a freezer bag, make sure you use a sturdy one, and cut the tip small, you can always cut it bigger if you need.

Pipe mounds of dough, a little larger than a quarter, onto a parchment lined baking sheet, evenly spaced on the sheet. Sprinkle some cheese on top of the mounds, then bake those suckers into amazingness!


Gougeres, by David Lebovitz

1/2 cup water

3 Tbsp butter, small cubes

1/4 tsp salt

Chile powder, as desired

1/2 cup flour, all-purpose

2 eggs, large

1 Tbsp fresh chives, or fresh herb of your choice

3/4 cup cheese, grated fine (I think a combination of grated Parmesan and Gruyere is perfect)

  1. Preheat oven to 425F (I used a convection oven at 400F). Line 2 baking sheets with parchment paper.
  2. Place the water, butter, salt and chile powder in a small saucepan and bring to a boil, making sure the butter is melted.
  3. Take the saucepan off the heat, and dump all of the flour into the water at once. Stir quickly and vigorously with a wooden spoon until the dough mixture is consistent.
  4. Using a spatula, transfer the dough into a large food processor. Add the eggs and pulse the food processor until the egg thoroughly incorporated. Add chives and grated cheese, reserving 1 heaping tablespoon for later use. Mix well, dough will be sticky.
  5. With a pastry bag, fitted with a large tip or coupler, fill with dough. Pipe the dough into small mounds, a little larger than the size of a quarter, evenly spaced to about an inch.
  6. Sprinkle the tops of the mounds with the reserved cheese.
  7. Place the baking sheets in oven, and bake at 425F for 10 minutes. After 10 minutes, rotate trays, reduce heat to 375F (or 350F for convection) and bake for 20 more minutes, until gougeres are golden brown in color.
  8. Take gougeres out of oven, place on a cooling rack, and let rest for 5 minutes. Puffs will taste best served warm.

Monday, May 3, 2010

Super Easy Vegetarian Bean Tacos


Mexican food is a super favorite in our house. It is in stiff competition with Indian food for hubby's affection. We also love any holiday or excuse to make ethnic food. Everyone loves a theme menu, right?

Perfect for Cinco de Mayo, this is our favorite recipe for tacos, and is also the most ridiculously easy recipe ever.

Black Bean & Garbanzo Bean tacos

1 can Garbanzo Beans
1 can Black Beans
1 packet/3 tbsp Taco Seasoning

You will also need:

Taco Shells

Taco Toppings, such as:
Diced Tomatoes
Chopped Lettuce
Shredded Cheese
Sour Cream
Black Olives
Sauteed Onions


Taco Stuffing steps:
1. Open and empty both cans of beans, without draining liquids, into a large skillet. Add desired amount of taco seasoning. We add about 3 tablespoons from a large contianer of seasoning, but one small envelope of seasoning will also be fine. Mix seasoning into bean mixture.


2.With medium-high heat, bring beans and liquid to a simmer. Once at a simmer, stir often until thickened, about 5-10 minutes longer. For a saucier taco filling, take mixture off heat earlier.


Assemble your taco with your favorite toppings, and enjoy!

Tuesday, April 27, 2010

Daring Baker's Steamed English Pudding


This month’s challenge was a traditional steamed English Pudding. I was a little skeptical, but decided to push through, particularly since I skipped last month.

The challenge was hosted by Ester of The Lilac Kitchen, and she has the full post of information on her blog. The post needed to use suet or a suet replacement. Suet is fat from a cow or sheep, fat that surrounds the kidneys. Blech. So I opted to use Crisco, which worked fine. Esther also gave the option to make a suet pudding crust, or a steamed suet sponge pudding. I chose the suet crust, with a savory filling.

I cut and sauteed leeks in a little oil, sprinkled flour on the leeks, added vegetable broth, which made it a little gooey, based on this recipe here.

I also cooked a little veggie sausage in a dish, and added the sausage to the leeks.


First, I mixed the flour with the crisco, then added about 3/4 cup water to make the dough slightly sticky. On a floured surface I rolled the dough out, taking about a third of the dough for the lid of the pudding. When rolled out, I pieced the dough into a greased 1.4 liter pyrex dish. The dough was tearing a little bit, so it was a little like putting a puzzle together.


Once the dough was fitted into the dish, I spooned the filling into the dish. Then I placed the dough lid on the dish, pinching it closed. There was a lot more dough than filling, so I cut off excess, pinched the dough closed again.


I fitted a large stock pot with a steamer basket, my jerryrigging of a steamer. With water on the bottom, I set the pyrex bowl on top of the steamer basket, and steamed the pudding for about 3 hours. Since I am a magnet for disasters in the kitchen, the water in the steamer actually boiled dry, oops!


So, I let the pudding sit for a couple minutes, turned it out on a plate, and voila, dinner!


Sunday, February 28, 2010

Daring Baker’s Tiramisu

What an awesome challenge! I love tiramisu, the creamy paired with the soaked biscuits, yum!

IMG_6082 (800x533)

I have never attempted to make tiramisu totally from scratch, but I really enjoyed it. The recipe wasn't hard, but had several components and required set-aside time and prior planning.

Recipe from Aparna at My Diverse Kitchen and Deeba at Passionate About Baking. See their blogs for full recipes. Too much retyping!

I just got back from an awesome wedding, so this is going to be a picture post, and a little late at that too!

IMG_6050 (800x523)

The savoiardi biscuits, before baking.

IMG_6057 (800x533)

Port used in the zabaglione. I hadn’t used port in baking before, neat opportunity to use a favorite spirit.

IMG_6063 (800x532)

The Zabaglione folded with the mascarpone and pastry cream, before adding the whipped cream.

IMG_6066 (800x517)

Putting the tiramisu together. I used a small dish, and placed plastic wrap in the dish before layering, because I wanted to de-mold the dessert.

IMG_6074 (800x533)

The tiramisu didn’t de-mold the way I wanted it to, next time I will layer it in the dish I intend to serve it in.

Happy Baking!

Sunday, February 21, 2010

Valentine’s Day Pesto Gnocchi

IMG_6036 (800x506)

A week later and I hope your Valentine's Day was happy and full of love!

Valentine's Day isn't huge for hubby and I, but we acknowledge it nonetheless. Back when we just met, Valentine's Day was one of the first dates we went on. As a freshmen in college, Hubby invited me over to his apartment for a dinner he had prepared. It was super cute and thoughtful, and after we were married, I found out he had made the entire dinner ahead of time to make sure it would work out! What a sweet guy, at the time I had no idea what effort was put into the dinner.

Hubby has been cooking fantastic food for me since that first Valentine's Day Date. This year he deserved to be cooked for, and I knew just what to make. Hubby loves anything cheesy. And gnocchi.

So Gratineed Pesto Gnocchi fit the bill, with a side of Sautéed Broccoli.

IMG_6033 (800x526)

To finish the meal, a Flourless Chocolate Torte from Let Them Eat Cake.

IMG_6039 (800x477)

Potato Gnocchi Gratineed with Mozzarella and Pesto

from Cooks Illustrated

Potato Gnocchi

(Potato Ricer is needed for this recipe. I have never made gnocchi without the ricer, so I am unsure of an alternate to a potato ricer)

2 lb russet potatoes, scrubbed
1 1/4 cup All-Purpose Unbleached Flour, plus extra if needed
1 tsp table salt
2 Tbsp butter, melted
Pesto Sauce, recipe below
4 oz fresh Mozzarella cheese, sliced thin

1. Pierce the potatoes with a fork several times on each side. Place potatoes on a microwaveable plate, and heat in microwave for 12 minutes. In the meantime, preheat oven to 450F.

IMG_6012 (800x533)

2. Place microwaved potatoes in oven straight onto oven rack, horizontal of the rack, so not to fall through if over baked ( I have had one potato fall apart and totally yucky up the oven, so since then, I place an empty baking sheet on the shelf underneath the potatoes, just in case. I haven't had a potato fall apart since, of course.).  Bake potatoes in oven for 20 minutes. (Make pesto sauce while potatoes are baking, using following recipe)

3. After potatoes have been taken out of the oven, use an oven mitt to hold potato in one hand, and peel potatoes with knife. Discard skin. With the potato ricer, rice potatoes into a large bowl. Let potatoes cool for about 15 minutes, until they are no longer hot. Don't turn the oven off, place it on broil to use later.

4. Sprinkle flour and salt over potato, and knead until the dough is soft and smooth. If sticky, add more flour, up to an additional 1 1/2 cups. Make sure the dough isn't sticky, or you will have to add more flour after you attempt to roll the dough into a rope, as I did.

5. Pinch off a quarter of the dough, and roll into a rope. If the rope falls apart, add more flour and start again. Cut the rope on a horizontal slant, 3/4 inch wide. Repeat with remaining dough.

IMG_6021 (800x533)

6. Bring a salted pot of water to a soft boil. I cooked the gnocchi in two batches, as not to crowd the pot. The original recipe said it would take the gnocchi about 2 minutes to cook and float to the surface and be done. My gnocchi floated in that amount of time, but it was a total of about 5 minutes for the gnocchi not to be too starchy.  When the first batch is done, take the gnocchi out with a slotted spoon and place in drainer. Repeat cooking process with remaining gnocchi.

7. Transfer gnocchi into medium mixing bowl and toss with melted butter. Mix prepared pesto in with the gnocchi, starting with a small amount, and adding more until you are pleased with the ratio. I added about half of the prepared pesto, about 1/2 cup.

IMG_6026 (800x533)

8. Transfer gnocchi into gratin dish. Cover with mozzarella cheese.  Place in oven and broil for 5 minutes until cheese is bubbly and beginning to brown. Take dish out of oven and let cool for several minutes.

Pesto Sauce

8 medium garlic cloves, unpeeled
3 cups fresh basil, stemmed and trimmed
1/2 cup parmesan cheese, shredded
1/4 cup part-skim ricotta cheese (Original recipe said not to use substitute fat-free ricotta, but that was what was in the fridge. I added about 2 tbsp heavy cream to the ricotta)
2 shallots, minced
2 Tbsp extra-virgin olive oil
salt and black pepper

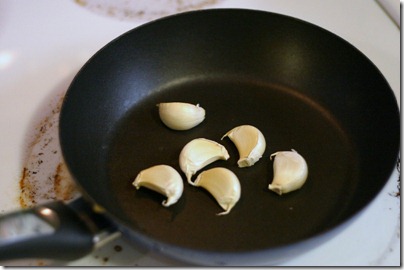
1. Toast garlic in a medium skillet over medium heat for about 5 minutes, tossing garlic in the pan occasionally. Place garlic on a cutting board to cool. When cool, peel.
IMG_6011 (800x533)

2. Place trimmed basil in a large ziploc bag, and use a heavy object to bruise the basil. Original recipe suggested using a meat tenderizer or rolling pin. We don't eat meat and don't had a tenderizer, so I tried the rolling pin, which didn't work well. I then used a heavy lemon juicer, which worked wonderfully.

3. Combine all ingredients in food processor and process until smooth, scraping down sides as needed.  My final product with the pesto was a little chunkier than I would have liked, so  I mixed in some additional olive oil.

4. Place pesto aside until needed.